How to Block BitTorrent Traffic using MikroTik Layer7 Protocol
Using popular BitTorrent clients such as uTorrent/BitTorrent etc, we can load a torrent file or a magnet link into it and it will start downloading required files such as software, video, music, ebooks, games etc.
In a shared network environment such as offices, co-working spaces, restaurants or cafes, someone downloading files using torrents will result in problems for the rest in browsing the internet efficiently, latency while video conferencing etc. This happens because in order to download data using torrents, a peer-to-peer (P2P) network is established wherein a large number of simultaneous connections to the various peers are created by the BitTorrent client which stresses out the resources on your router/modem.
In order to prevent this, it is recommended that torrent downloading be blocked altogether in a shared network environment.
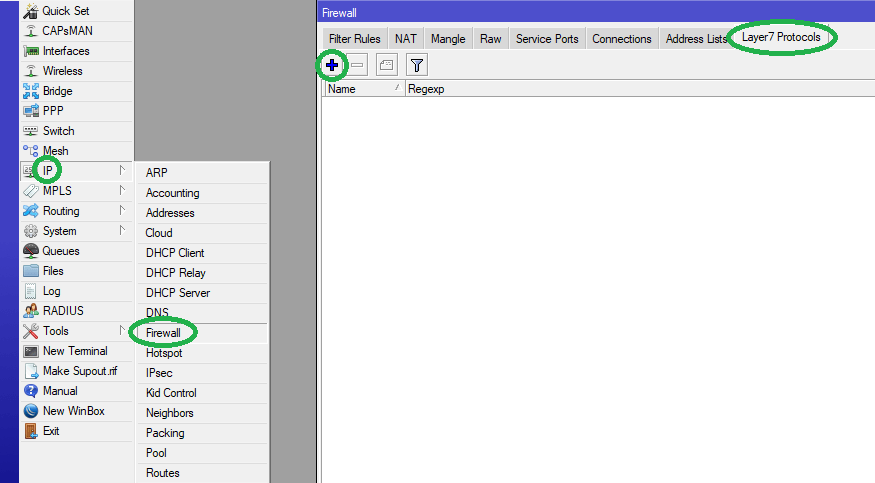
MikroTik’s Layer7 Protocol can be used to mark and block unwanted traffic, in this case all the p2p (BitTorrent) data. The Layer7 Protocol on MikroTik can be found in the IP > Firewall section.
The L7 protocol matcher searches for certain patterns of data in the first 10 packets, or in the first 2KB of data, in the TCP/UDP/ICMP streams of any new connections. This matcher is based on the entries added to the ‘Regexp’ (Regular Expression) field in the L7 Protocol. This regexp is used to define search patterns for keywords in the URLs.
If a pre-defined pattern is found in the connection, then based on the conditions defined in the filter rules using the layer7 protocol, an action will be taken on the data stream. If no pattern is found in the connection, then the matcher will stop inspecting the connection further.
In order to identify and drop BitTorrent traffic, we will make use of the L7 protocol combined with firewall filter rules. This is to be done in the following manner:-
Step 1: Go to IP > Firewall > Layer7 Protocols tab. Click on '+' to add a new entry.
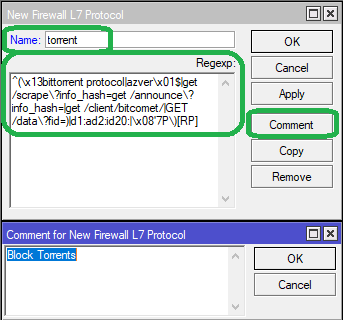
Step 2: Enter ‘torrent’ in the Name field. Copy and paste the following Perl expression in full in the Regexp field:
^(\x13bittorrent protocol|azver\x01$|get /scrape\?info_hash=get /announce\?info_hash=|get /client/bitcomet/|GET /data\?fid=)|d1:ad2:id20:|\x08'7P\)[RP]
Click on Comment to label the protocol entry as "Block Torrents". Click Apply then OK
The MikroTik terminal command for adding the above rule is as follows:
/ip firewall layer7-protocol add comment="Block Torrents" name=torrent regexp="^(\\x13bittorrent protocol|azver\\x01\$|get /scrape\\\?info_hash=get /announce\\\?info_hash=|get /client/bitcomet/|GET /data\\\?fid=)|d1:ad2:id20:|\\x08'7P\\)[RP]"
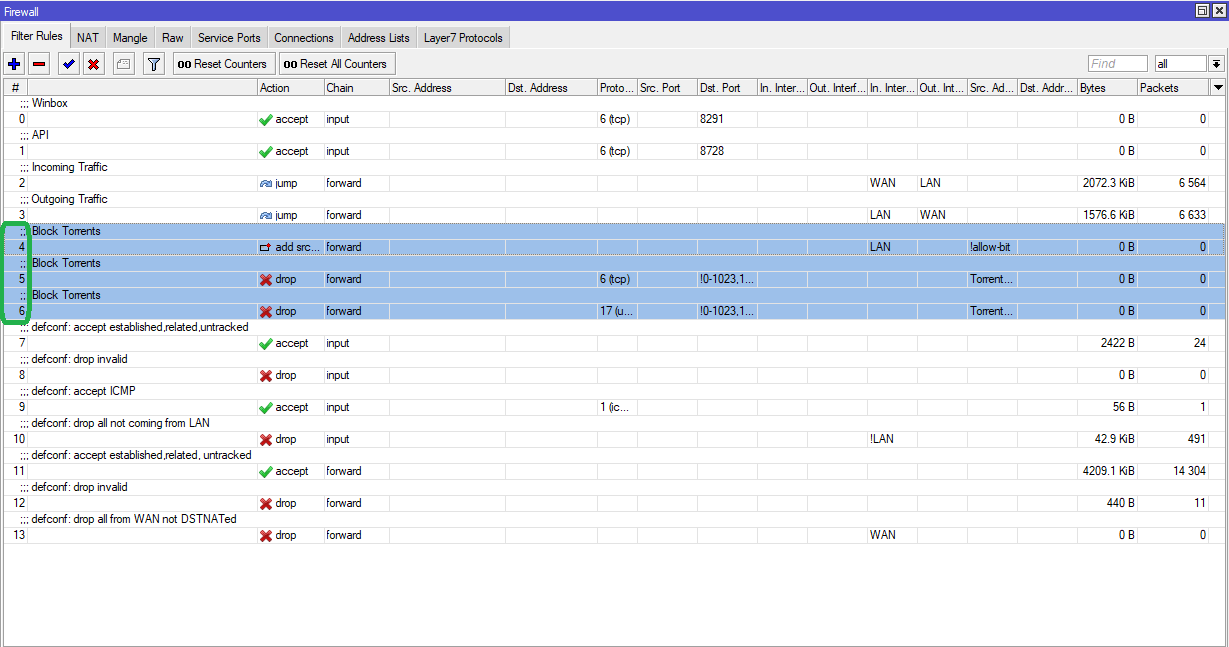
In Winbox, click on New Terminal. Copy and paste the above command in the terminal window and hit enter. The firewall rule as seen in the images above will be added instantly.
Step 3: Create filter rules to effectively block BitTorrent traffic.
Go to IP > Firewall > Filter Rules tab. Click on '+' to add a new entry.
In the General tab, select chain as forward, and select In Interface List as LAN
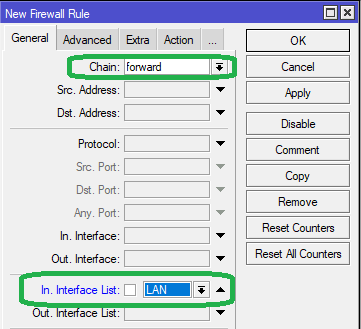
The purpose of defining In Interface List in this case is so that otherwise all P2P clients' remote IP addresses also get unnecessarily added to the 'Torrent-Conn' address list. Less addresses = less memory consumption
You can define a LAN list in the Interfaces > List section and add all local networks in the LAN list for identification purposes.
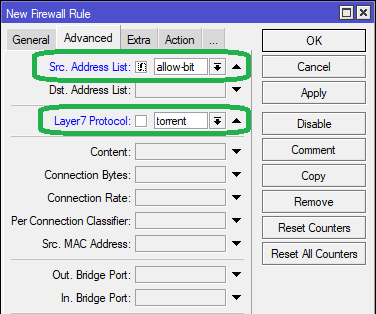
Step 4: In the Advanced tab, set the Src Address Listfield as "allow-bit", with the invert option "!" enabled.
select the Layer7 Protocol as torrent from the dropdown list.
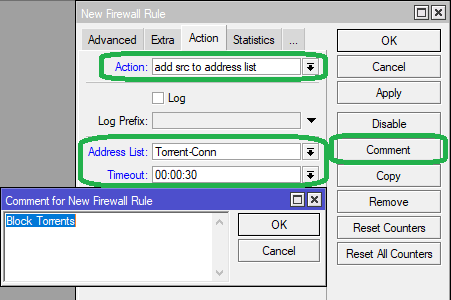
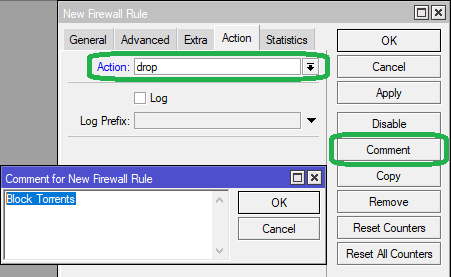
Step 5: In the Action tab, select Action as add src to address list, and in the Address List field, enter "Torrent-Conn"
Set the Timeout as 00:00:30 (30 seconds)
Click on Comment to label the rule as "Block Torrents". Click Apply then OK
The MikroTik terminal command for adding the above rule is as follows:
/ip firewall filter add chain=forward in-interface-list=LAN src-address-list=!allow-bit layer7-protocol=torrent action=add-src-to-address-list address-list=Torrent-Conn address-list-timeout=30s comment="Block Torrents"
This filter rule will dynamically add host addresses on the local network to which the BitTorrent traffic is being forwarded to from the router, to an address list "Torrent-Conn".
There are two more filter rules we need to add to ensure that no other traffic are blocked other than torrents.
Go to IP > Firewall > Filter rules and add a new rule.
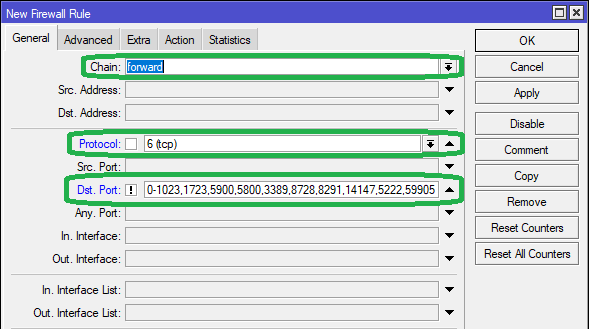
In the General tab, select protocol as tcp
In the Dst Port field, add the below port numbers or simply copy paste from here
0-1023,1723,5900,5800,3389,8728,8291,14147,5222,59905
Click on the invert [!] option as seen below.
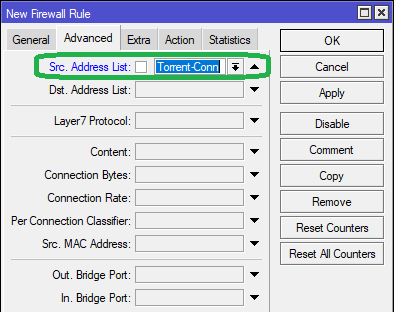
In the Advanced tab, select the Src Address List as Torrent-Conn from the dropdown list
In the Action tab, select Action as drop from the dropdown list
Click on Comment to label the rule as "Block Torrents". Click on Apply then OK.
The MikroTik terminal command for adding the above rule is as follows:
/ip firewall filter add chain=forward protocol=tcp dst-port=!0-1023,1723,5900,5800,3389,8728,8291,14147,5222,59905 src-address-list=Torrent-Conn action=drop comment="Block Torrents"
Click on '+' add another new rule
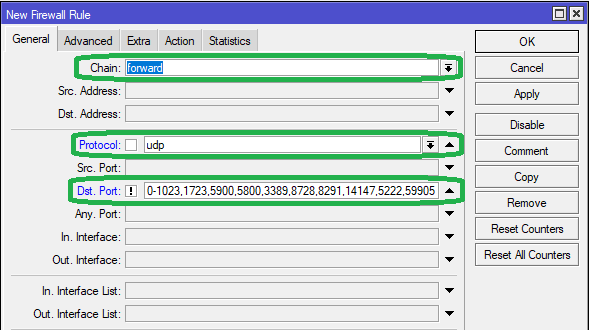
In the General tab, select protocol as udp
in the Dst Port field, add the below ports or copy paste from below:
0-1023,1723,5900,5800,3389,8728,8291,14147,5222,59905
Click on the invert [!] option as seen below.
In the Advanced tab, select the Src Address List as Torrent-Conn from the dropdown list
In the Action tab, select Action as drop from the dropdown list
Click on Comment to label the rule as "Block Torrents". Click on Apply then OK.
The MikroTik terminal command for adding the above rule is as follows:
/ip firewall filter add chain=forward protocol=udp dst-port=!0-1023,1723,5900,5800,3389,8728,8291,14147,5222,59905 src-address-list=Torrent-Conn action=drop comment="Block Torrents"
These two filter rules will block tcp and udp packets respectively with BitTorrent data from being forwarded over non-common ports to those hosts (devices) listed in the Torrent-Conn address list, thereby effectively blocking Torrent downloads.
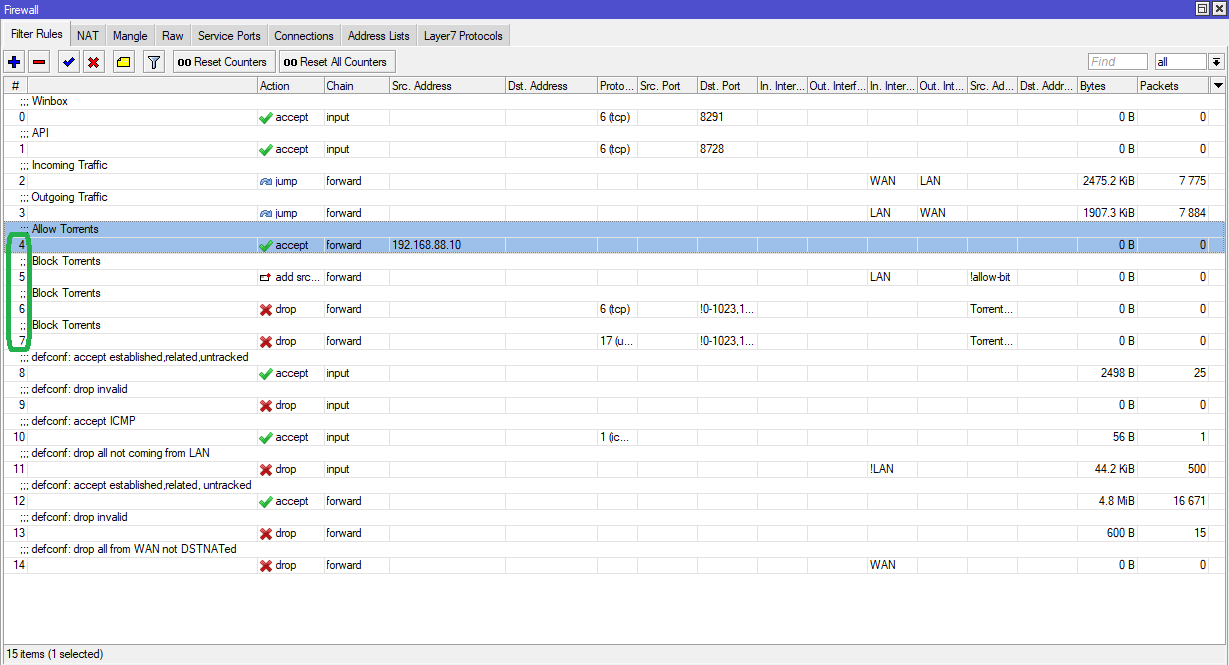
Drag all these three filter rules labeled as Block Torrents above the essential firewall filter rules.
If there are multiple local networks created on the MikroTik router, the above rules created will block torrent downloads across all networks.
Block torrent traffic for particular network only
In order to block torrents across only one network from among multiple networks created on MikroTik, we specify the network on which torrent downloads are to be blocked in the Src. Address field in the General tab while adding the Block Torrents “drop” rules, as seen in the image below:

The MikroTik terminal command for adding the above rule is as follows:
/ip firewall filter add chain=forward src-address="192.168.88.0/24" protocol=tcp dst-port=!0-1023,1723,5900,5800,3389,8728,8291,14147,5222,59905 src-address-list=Torrent-Conn action=drop comment="Block Torrents"
/ip firewall filter add chain=forward src-address="192.168.88.0/24" protocol=udp dst-port=!0-1023,1723,5900,5800,3389,8728,8291,14147,5222,59905 src-address-list=Torrent-Conn action=drop comment="Block Torrents"
The rule will thus block torrent downloads on all devices connected on the 192.168.88.0/24 network.
Block torrent traffic for particular IP Range only
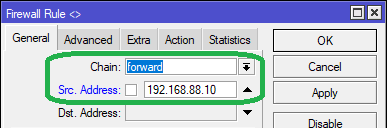
In order to block torrents only for a certain IP range, say the DHCP pool range, we specify the IP range in the Src Address field in the General tab while adding the Block Torrents “drop” rules, as seen in the image below:

The MikroTik terminal command for adding the above rule is as follows:
/ip firewall filter add chain=forward src-address="192.168.88.10-192.168.88.254" protocol=tcp dst-port=!0-1023,1723,5900,5800,3389,8728,8291,14147,5222,59905 src-address-list=Torrent-Conn action=drop comment="Block Torrents"
/ip firewall filter add chain=forward src-address="192.168.88.10-192.168.88.254" protocol=udp dst-port=!0-1023,1723,5900,5800,3389,8728,8291,14147,5222,59905 src-address-list=Torrent-Conn action=drop comment="Block Torrents"
The rule will thus block torrent downloads on all devices which are dynamically or manually assigned IP addresses in the range 192.168.88.10-192.168.88.254. The devices manually assigned IP addresses outside the DHCP pool will be able to download torrents.
Block torrent traffic for particular device only
In order to block torrents only for a certain device, there are two methods through which this can be done:
Method 1:We specify the static IP of the device in the Src. Address field in the General tab while adding the Block Torrents “drop” rule, as seen below:
The MikroTik terminal command for adding the above rule is as follows:
/ip firewall filter add chain=forward src-address="192.168.88.10" protocol=tcp dst-port=!0-1023,1723,5900,5800,3389,8728,8291,14147,5222,59905 src-address-list=Torrent-Conn action=drop comment="Block Torrents"
/ip firewall filter add chain=forward src-address="192.168.88.10" protocol=udp dst-port=!0-1023,1723,5900,5800,3389,8728,8291,14147,5222,59905 src-address-list=Torrent-Conn action=drop comment="Block Torrents"
The rule will thus block torrent downloads on the device assigned IP of 192.168.88.10.
Method 2:We specify the MAC address of the device in the Src. MAC Address field in the Advanced tab while adding the Block Torrents “drop” rule, as seen below:
The MikroTik terminal command for adding the above rule is as follows:
/ip firewall filter add chain=forward src-mac-address="AA-BB-CC-DD-EE-FF" protocol=tcp dst-port=!0-1023,1723,5900,5800,3389,8728,8291,14147,5222,59905 src-address-list=Torrent-Conn action=drop comment="Block Torrents"
/ip firewall filter add chain=forward src-mac-address="AA-BB-CC-DD-EE-FF" protocol=udp dst-port=!0-1023,1723,5900,5800,3389,8728,8291,14147,5222,59905 src-address-list=Torrent-Conn action=drop comment="Block Torrents"
The rule will thus block torrent downloads on the device with MAC address AA:BB:CC:DD:EE:FF.
If torrents are blocked across all networks, or on a certain network, but certain specific devices need to be given access to download torrents, then we will create another filter rule and place it above the existing Block Torrents rule. The method is as follows:
Step 1: Go to IP > Firewall > Filter Rules tab, Click on ‘+’ to add a new entry.
Step 2: In the General tab, select chain as forward, set the Src Address as required based on 3 conditions mentioned below
Step 3: In the Advanced tab, select the Layer7 Protocol as torrent from the dropdown list
Step 4: In the Action tab, select action accept
Step 5: Click on Comment to label the rule as "Allow Torrents", Click Apply then OK
The 3 conditions are as follows:
If a single device is to be given access to download torrents, then there are two methods through which this can be done:
Method 1: We specify the static IP of the device in the Src. Address field in the General tab, as seen below:

The MikroTik terminal command for adding the above rule is as follows:
/ip firewall filter add chain=forward src-address="192.168.88.10" layer7-protocol=torrent action=accept comment="Allow Torrents"
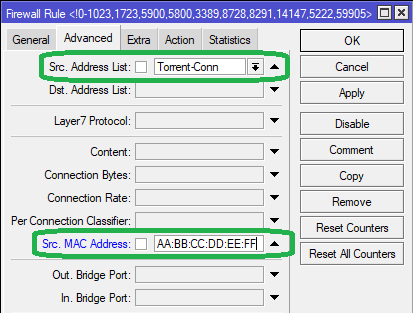
Method 2: We specify the MAC address of the device in the Src. MAC Address field in the Advanced tab, as seen below:
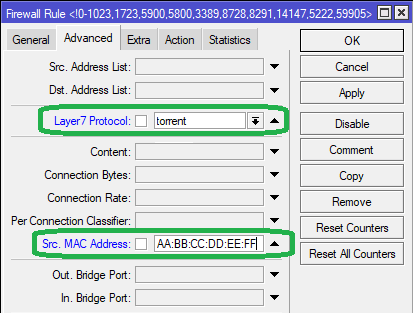
The MikroTik terminal command for adding the above rule is as follows:
/ip firewall filter add chain=forward src-mac-address="AA-BB-CC-DD-EE-FF" layer7-protocol=torrent action=accept comment="Allow Torrents"
If a bunch of devices are to be given access to download torrents, then we specify the IP range of the devices in the Src. Address field in the General tab, as seen below. Note that these devices will need to be manually assigned these IP addresses, preferably outside the DHCP pool range, either directly on the devices itself, or through MikroTik using DHCP static leases.

The MikroTik terminal command for adding the above rule is as follows:
/ip firewall filter add chain=forward src-address="192.168.88.10-192.168.88.254" layer7-protocol=torrent action=accept comment="Allow Torrents"
Drag this filter rule labeled as Allow Torrents above the Block Torrents firewall filter rules.
Thus, the “Allow Torrents” rule created here will allow Torrents to be downloaded by the specific devices decided as per the three conditions mentioned above, while BitTorrent traffic will remain blocked for the rest of the devices on the network.