How to block adult websites through DNS filtering in Mikrotik
The internet as we know is a vast sea of content including text-based webpages, audio, video etc, however we may find that not all of it is suitable for general consumption. There are ways through which one could block certain categories of websites to ensure no one accesses them on a private or a public network. These services are collectively known as content-filtering services.
One of the several reasons to make use of content-filters is to ensure that our kids do not accidentally stumble across mature or pornographic content while browsing the web, and the same is generally applied to public networks.
Another purpose of using content-filters is that they also protect a network from malicious content such as viruses from some websites, malware and phishing software, while also speeding up connectivity in general. One of the several methods to have content-filtering enabled on a network is by making use of DNS filters.
The Domain Name System (DNS) acts like a phonebook for the internet, it is used to convert human readable domain names like www.google.com into Internet Protocol (IP) addresses like 173.194.39.78. How they achieve this is that these nameservers, distributed throughout the world, store DNS records which are the actual files that contain information such that “this domain” maps to “this IP address”.
How do DNS Filters work?
The organizations that provide DNS Filters maintain a database of all domains categorized as pornographic, phishing, malware, ad servers, gaming, file-sharing etc. These databases are kept updated on a regular basis. Based on the type of DNS filter that has been chosen, the responses to the DNS queries will be returned accordingly. For e.g, if a DNS filter has been chosen specifically to block adult content on the network, then for any query to a website which is classified as a pornographic site by the filter based on its logs, the DNS response will not return the website’s IP address and hence the website won’t be loaded, instead a webpage that displays information as to why the requested website cannot be loaded is displayed.
These DNS filters can be used on a particular browser only by means of using browser extensions if available, on a particular device only by manually assigning the DNS servers in the device network settings, or on all or any particular local network by setting these DNS servers on the routers.
CleanBrowsing.org is one such provider that offers three different types of content-filter options as part of their free DNS Filter server package: Security Filter, Adult Filter & Family Filter.
1. The Security Filter blocks access to phishing, spam, malware and malicious domains.
2. The Adult Filter blocks access to all domains blocked by the Security Filter and additionally blocks adult, pornographic and explicit sites. Google and Bing Search are set to the Safe Mode.
3. The Family Filter blocks access to all domains blocked by the Security Filter & Adult Filter and additionally blocks proxy and VPN domains that are used to bypass these filters. Mixed content sites (like Reddit) are also blocked. Google, Bing and YouTube Search are set to the Safe Mode.
The IPv4 address of DNS servers for each filter are as follows:-
Security: 185.228.168.9 and 185.228.169.9
Adult: 185.228.168.10 and 185.228.169.11
Family: 185.228.168.168 and 185.228.169.168
Here, we will make use of the Adult Filter to check out how content-filtering can be enabled through a MikroTik router.
There are several ways by which DNS filters can be used on a MikroTik router to enable content-filtering:
1. Enabling Adult Filter on all local networks (in case there are multiple LAN/VLANs set up)
2. Enabling Adult Filter on a particular local network
3. Enabling Adult Filter on devices in a particular IP range such as DHCP pool.
4. Enabling Adult Filter on a particular device
We will have a look at each method one by one.
1. Enabling Adult Filter on all local networks
-
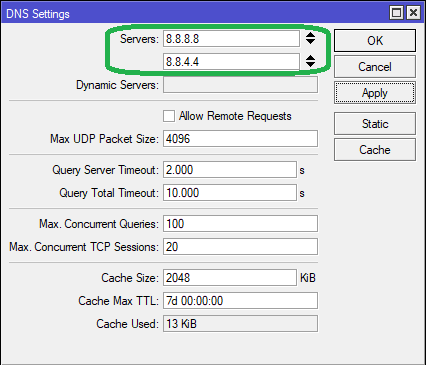
Step 1: Go to IP > DNS. Set the Servers as 185.228.168.10 and 185.228.169.11.
Click Apply and OK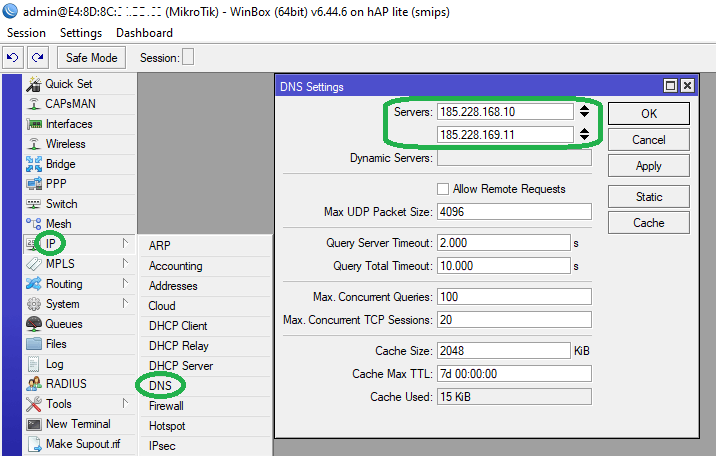
-
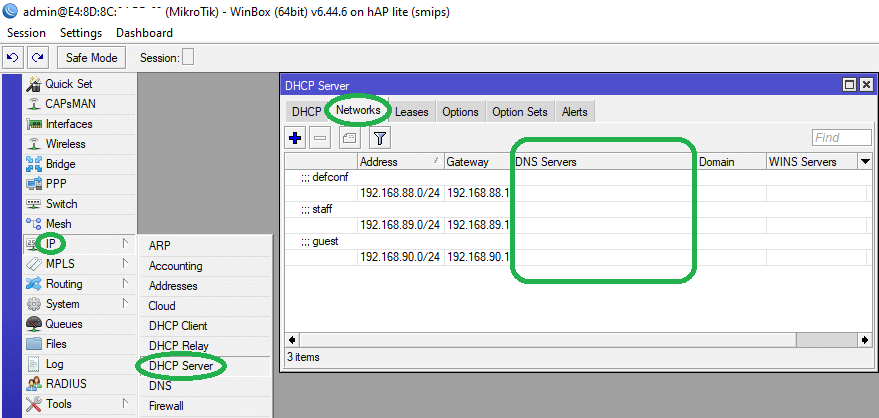
Step 2: Go to IP > DHCP Server > Networks tab, Make sure no DNS servers are set up on individual networks.
The MikroTik terminal command for adding the above rule is as follows:
/ip dns set servers="185.228.168.10,185.228.169.11"
/ip dhcp-server network set [find] dns-server=""
In Winbox, click on New Terminal. Copy and paste the above command in the terminal window and hit enter. The firewall rule as seen in the images above will be added instantly.
In this manner, all devices connected to the internet through this MikroTik router will have their DNS queries resolved by CleanBrowsing’s Adult Filter DNS servers.
2. Enabling Adult Filter on a particular local network
Refer below screenshot, there are 3 local networks set up on the MikroTik router – default, staff & guest. We will enable the Adult Filter only on the guest network.
-
Step 1: Go to IP > DHCP Server > Networks. Select the network on which the filter is to be applied – double-click on it to open a new window.
In the DNS Servers field, set the servers as 185.228.168.10 and 185.228.169.11. Click Apply and OK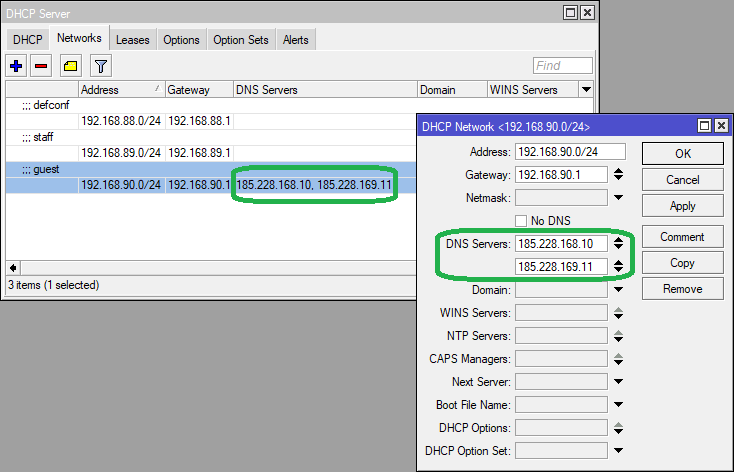
-
Step 2: Go to IP > DNS tab, set the servers as 8.8.8.8 and 8.8.4.4 (Google public DNS) or any other public DNS servers of your choice.
You can also decide different DNS filters for different networks and configure it accordingly. If you don’t want to enable any filtering on other networks, make sure no DNS servers are set up on the other local networks in IP > DHCP Server > Networks.
The MikroTik terminal command for adding the above rule is as follows:
/ip dhcp-server network set [find address="192.168.90.0/24"] dns-server="185.228.168.10,185.228.169.11"
/ip dns set servers="8.8.8.8,8.8.4.4"
In Winbox, click on New Terminal. Copy and paste the above command in the terminal window and hit enter. The firewall rule as seen in the images above will be added instantly.
In this manner, only the devices on the guest network on this MikroTik router will be blocked from accessing websites having pornographic and explicit content.
3. Enabling Adult Filter on a devices in a particular IP range
It is possible to enable filters for just a specific IP range. In this example, we will enable the adult filter on all devices dynamically assigned local IP addresses through the DHCP server.
For this, we will use a method called Force DNS, and use the default local network for checking out this method. Make note that for the default network, the gateway is 192.168.88.1 and the DHCP pool is 192.168.88.10-192.168.88.254.
-
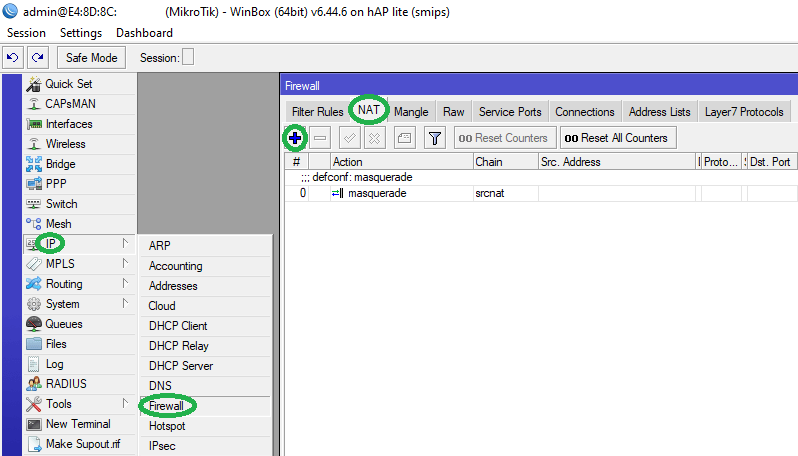
Step 1: Go to IP > Firewall > NAT. Click on ‘+’ to add a new rule.
-
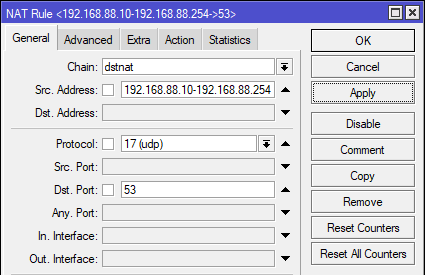
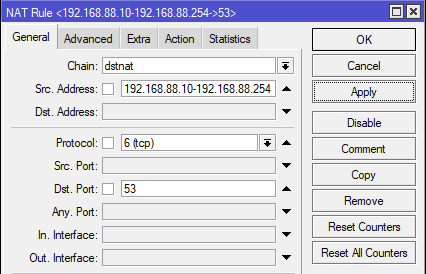
Step 2: In the General tab, select chain as dstnat from the dropdown list.
In the Src Address field, enter the IP range ie 192.168.88.10-192.168.88.254
Select Protocol as udp, and set Dst. Port as 53
-
Step 3: In the Action tab, set Action as dst-nat from the dropdown list.
Set To Addresses as the Primary DNS server i.e. 185.228.168.10 Set To Ports as 53
Set comment for NAT Rule as CleanBrowsing DNS. Click Apply then OK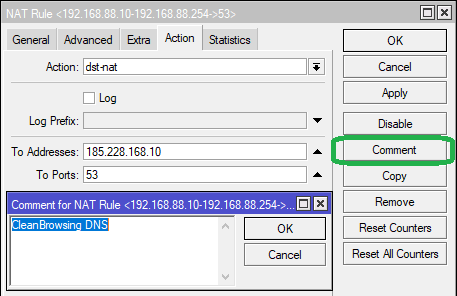
-
Step 1: In the General tab, select chain as dstnat from the dropdown list.
In the Src Address field, enter the IP range ie 192.168.88.10-192.168.88.254
Select Protocol as tcp, and set Dst. Port as 53
-
Step 2: In the Action tab, set Action as dst-nat from the dropdown list.
Set To Addresses as the Primary DNS server i.e. 185.228.168.10 Set To Ports as 53
Set comment for NAT Rule as CleanBrowsing DNS. Click Apply then OK
-
Step 1: In the General tab, select chain as dstnat from the dropdown list.
In the Src Address field, enter the IP range ie 192.168.88.10-192.168.88.254
Select Protocol as udp, and set Dst. Port as 53
-
Step 3: In the Action tab, set Action as dst-nat from the dropdown list.
Set To Addresses as the Secondary DNS server i.e. 185.228.169.11 Set To Ports as 53
Set comment for NAT Rule as CleanBrowsing DNS. Click Apply then OK
-
Step 3: In the General tab, select chain as dstnat from the dropdown list.
In the Src Address field, enter the IP range ie 192.168.88.10-192.168.88.254
Select Protocol as tcp, and set Dst. Port as 53
-
Step 2: In the Action tab, set Action as dst-nat from the dropdown list.
Set To Addresses as the Secondary DNS server i.e. 185.228.169.11 Set To Ports as 53
Set comment for NAT Rule as CleanBrowsing DNS. Click Apply then OK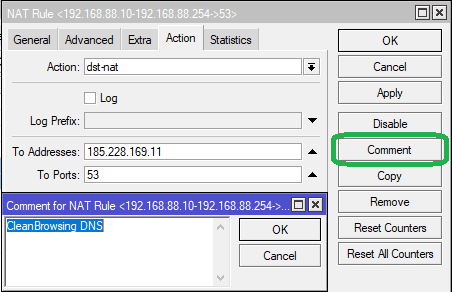
-
Drag these 4 rules right to the top in IP > Firewall > NAT, as seen below:

Similar to above step, we will now add another rule for tcp traffic passing through CleanBrowsing DNS.
We can also add two more rules same as above steps for Secondary DNS Server - this is to ensure in case if primary DNS server go down, the blocking still remain activated.
The MikroTik terminal command for adding the above 4 rules are as follows:
/ip firewall nat add chain=dstnat src-address="192.168.88.10-192.168.88.254" protocol=udp dst-port=53 action=dst-nat to-addresses=185.228.168.10 to-ports=53 comment="CleanBrowsing DNS" place-before=0
/ip firewall nat add chain=dstnat src-address="192.168.88.10-192.168.88.254" protocol=tcp dst-port=53 action=dst-nat to-addresses=185.228.168.10 to-ports=53 comment="CleanBrowsing DNS" place-before=0
/ip firewall nat add chain=dstnat src-address="192.168.88.10-192.168.88.254" protocol=udp dst-port=53 action=dst-nat to-addresses=185.228.169.11 to-ports=53 comment="CleanBrowsing DNS" place-before=0
/ip firewall nat add chain=dstnat src-address="192.168.88.10-192.168.88.254" protocol=tcp dst-port=53 action=dst-nat to-addresses=185.228.169.11 to-ports=53 comment="CleanBrowsing DNS" place-before=0
In Winbox, click on New Terminal. Copy and paste the above command in the terminal window and hit enter. The firewall rule as seen in the images above will be added instantly.
All DNS queries are mostly resolved using UDP protocol, with port 53 being the default port for DNS. If the query cannot be resolved through UDP, then TCP protocol is used.
Note: The above rules will ensure that DNS resolution for all devices, dynamically or manually assigned IP addresses in the range mentioned above, is done using CleanBrowsing’s DNS servers, thereby enabling the Adult Filter. Devices assigned IP addresses outside this range will not have the filter enabled for them. Make sure that these DNS servers are not set in the DNS fields in IP > DNS or in IP > DHCP Server > Networks, else the filter will be enabled for the entire network.
4. Enabling Adult Filter on a particular device
In order to enable DNS filters on just a single device, we will use the same method of Force DNS. The steps to be followed are the same as the one in the above method ie. a total of 4 rules need to be added at the top in IP > Firewall > NAT.
However, the only difference here will be the entry in the Src Address field – instead of entering the IP range, we will enter only a single IP that is manually assigned to the device, either directly on the device itself, or through MikroTik using DHCP Static Lease. Refer the following below:
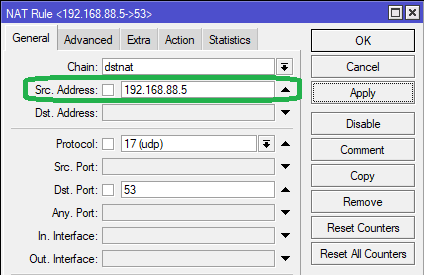
The MikroTik terminal command for adding the above rule is as follows:
/ip firewall nat add chain=dstnat src-address="192.168.88.5" protocol=udp dst-port=53 action=dst-nat to-addresses=185.228.168.10 to-ports=53 comment="CleanBrowsing DNS" place-before=0
You will have to add all four rules for both tcp/udp protocol and Primary/Secondary DNS servers.
Another method to identify the single specific device is through its MAC address. While adding the Force DNS rules, we need to add the MAC address of the device in the Src. MAC address field in the Advanced tab, as seen below:
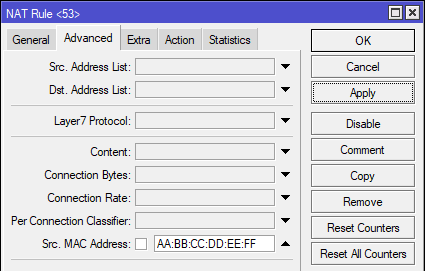
Note that in this case, the Src. Address field in the General tab is to be left blank.
The MikroTik terminal command for adding the above rule is as follows:
/ip firewall nat add chain=dstnat src-mac-address="AA-BB-CC-DD-EE-FF" protocol=udp dst-port=53 action=dst-nat to-addresses=185.228.168.10 to-ports=53 comment="CleanBrowsing DNS" place-before=0