PORT FORWARDING ON A MIKROTIK ROUTER FOR DVR/CCTV
If you have set up a device such as a DVR, or maybe a Biometric device at your office/restaurant and wish to access it externally, you will first require a public static IP on your internet connection, and secondly, port forwarding rules need to be set up on your router, so that will all traffic sent to that static IP through those particular ports are forwarded to the DVR/Biometric device itself.
We will first look at how the internet connection is set up on the MikroTik controller. There are two possible cases here, either the internet connectivity is configured into MikroTik through another router, or the internet cable is attached directly to the designated internet port on MikroTik and the WAN configuration is done via PPPoE/Static IP.
CASE I: MikroTik Controller gets its internet connectivity from another router
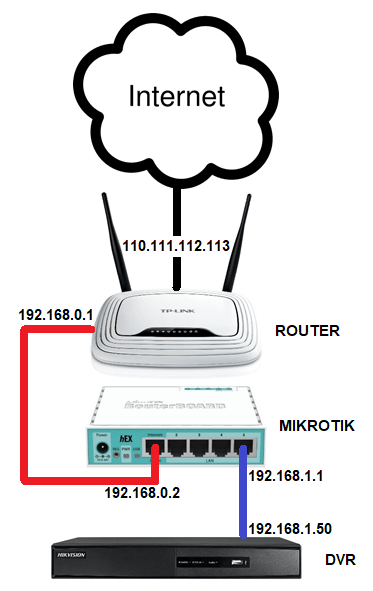
Let us assume that you have a public static IP ‘110.111.112.113’ configured on your internet ISP router. The LAN network set up on the router is 192.168.0.0/24, with gateway being 192.168.0.1. The DHCP Pool on the router is 192.168.0.100-192.168.0.254 with IP range (192.168.0.2-192.168.0.99) reserved for manual IP assignment for any device.
192.168.0.2 is the IP manually assigned to the WAN interface on MikroTik (coming from LAN port of ISP router) and either DMZ is enabled on this router to 192.168.0.2, or the required DVR ports are forwarded to 192.168.0.2 from ISP router. The LAN network on MikroTik is 192.168.1.0/24 and 192.168.1.50 is the IP manually assigned to the DVR, which is connected to MikroTik
Here are the steps to be followed to do port forwarding in order to externally access the DVR through port 80:
- Open Winbox and log in to your Routerboard.
-
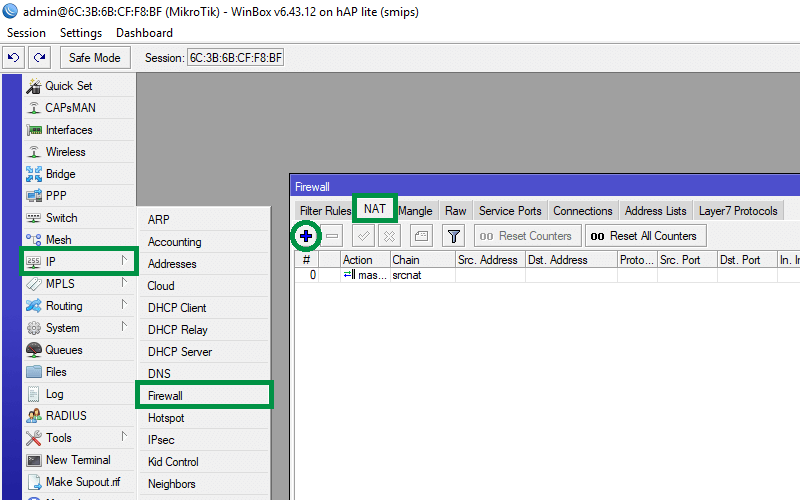
Click on IP -> Firewall. Go to the ‘NAT’ tab. Click on ‘+’ to add a new NAT rule.
-
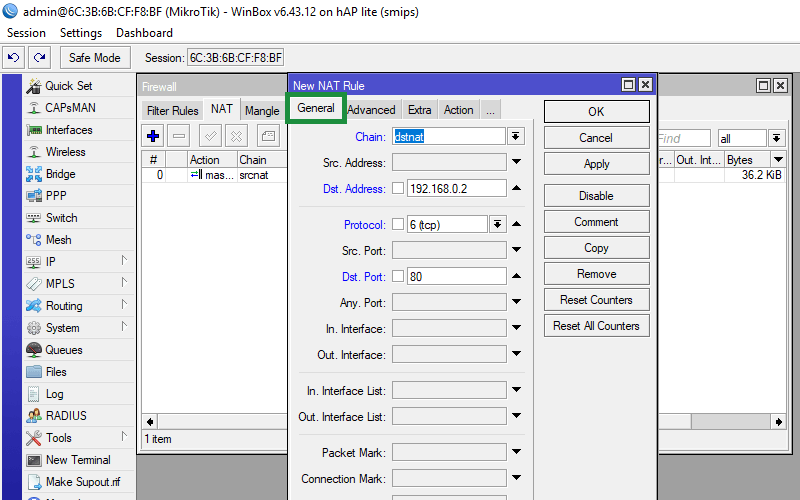
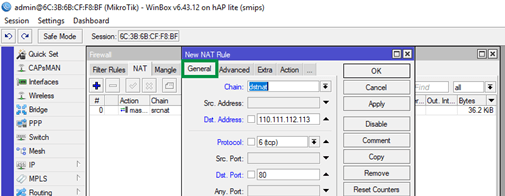
In the General tab;
- Select ‘Chain’ as ‘dstnat’
- Input the IP assigned to WAN port of MikroTik in the ‘Dst. Address’ field for eg in this case 192.168.0.2
- Select Protocol as ‘tcp’
- Input the desired port to be forwarded in the ‘Dst. Port’ field. in this case 80
-
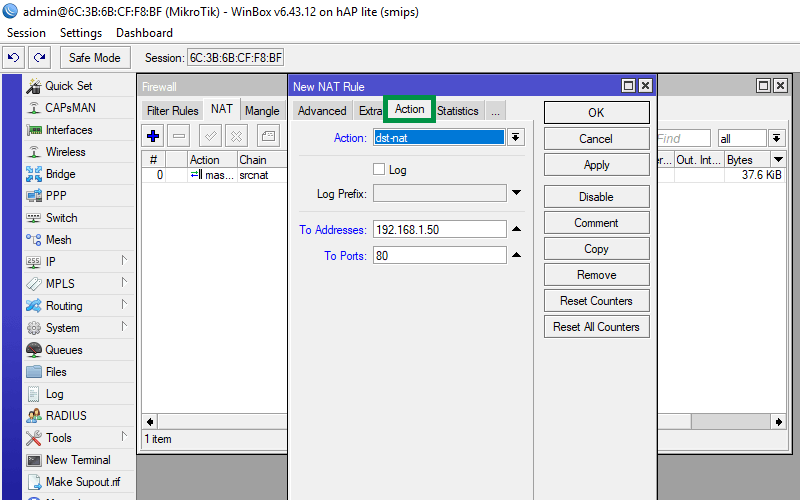
In the Action tab;
- Select Action as ‘dst-nat’
- In the ‘To Addresses’ field, input the IP address assigned to the DVR; in this case ‘192.168.1.50’
- In the ‘To Ports’ field, enter the port number to be forwarded eg. 80
- Click on the ‘Comment’ button if you wish to add a label to the rule.
- Click on ‘Apply’, then OK.
-
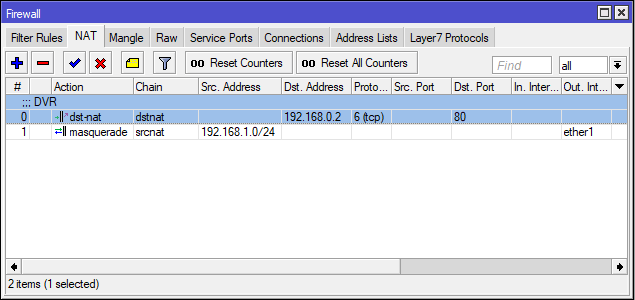
Click and drag the rule to the top of the list in the NAT rules.
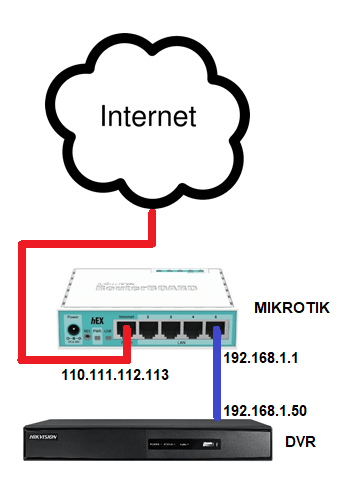
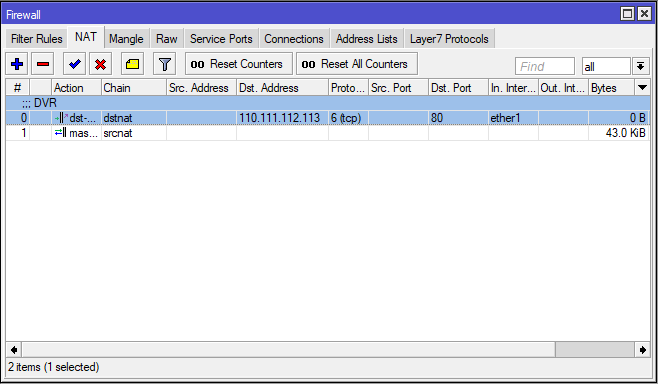
CASE II: Internet Cable is directly connected to WAN port on MikroTik, and configuration is done by Static IP/PPPoE
Let us again assume that you have a public static IP ‘110.111.112.113’ configured directly on Mikrotik router either through Static IP/PPPoE connection. The LAN network set up on Mikrotik is 192.168.1.0/24, with gateway being 192.168.1.1. The DHCP Pool on Mikrotik is 192.168.1.0/24 and 192.168.1.50 is the IP manually assigned to the DVR, which is connected to MikroTik
Here are the steps to be followed to do port forwarding in order to externally access the DVR through port 80:
- Open Winbox and log in to your Routerboard.
-
Click on IP -> Firewall. Go to the ‘NAT’ tab. Click on ‘+’ to add a new NAT rule.
-
In the General tab;
- Select ‘Chain’ as ‘dstnat’
- Input the IP assigned to WAN port of MikroTik in the ‘Dst. Address’ field for eg in this case 110.111.112.113
- Select Protocol as ‘tcp’
- Input the desired port to be forwarded in the ‘Dst. Port’ field. in this case 80
-
In the Action tab;
- Select Action as ‘dst-nat’
- In the ‘To Addresses’ field, input the IP address assigned to the DVR; in this case ‘192.168.1.50’
- In the ‘To Ports’ field, enter the port number to be forwarded eg. 80
- Click on the ‘Comment’ button if you wish to add a label to the rule.
- Click on ‘Apply’, then OK.
-
Click and drag the rule to the top of the list in the NAT rules.
Command Line method:
Copy the script below (Make sure to edit the respective fields as per requirement):
Case I
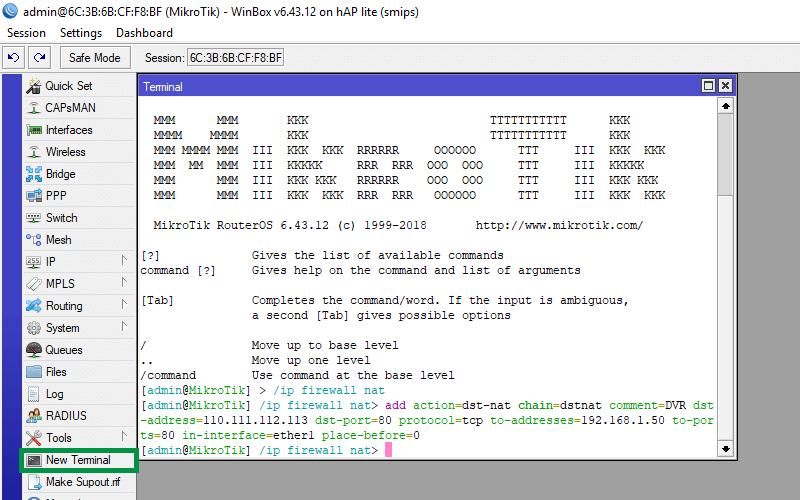
/ip firewall nat
add action=dst-nat chain=dstnat comment=DVR dst-address=192.168.0.2 dst-port=80
protocol=tcp to-addresses=192.168.1.50 to-ports=80 in-interface=ether1 place-before=0
Case II
/ip firewall nat
add action=dst-nat chain=dstnat comment=DVR dst-address=110.111.112.113 dst-port=80
protocol=tcp to-addresses=192.168.1.50 to-ports=80 in-interface=ether1 place-before=0
- In Winbox, click on ‘New Terminal’
- Paste the script in the Terminal window and click enter. The NAT rule is added automatically.