How to setup internet connection on MikroTik routerboard?
This article provides step-by-step guide to configure internet connection on any Mikrotik Routerboard from the ISP (main) router -
- Manual IP: In this we manually assign an IP address (e.g. 192.168.0.253) to the designated WAN port on the MikroTik router (generally Ether1). Make sure this IP address should fall within the DHCP range set up in the ISP router.
- Dynamic IP: Configure the WAN port on MikroTik Routerboard as a DHCP Client, so that the WAN port is dynamically assigned an IP address belonging to the DHCP pool on the main router when an ethernet cable is connected from the LAN port of the main router to the WAN port.
We recommend “Static IP” setup if you are planning to forward any ports access from the ISP router to the routerboard (e.g. for CCTV camera access or SQL server setup) as all the forwarding rules can only be assigned to a particular IP only. else you should go with the “Dynamic IP” setup which is faster than Static IP setup.
Prerequisites
-
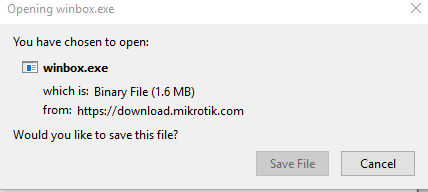
Go to http://www.mikrotik.com/download.html and download the latest “WINBOX” Configuration Tool under the Tools and Utilities section to your desktop. Save the file and install the setup. If you already have the WINBOX installed on your laptop/desktop - then make sure you have the latest version to avoid any configuration issues.
Now, we are ready to proceed with the configuration setup -
Manual IP Setup:
-
Step 1: Identify the DHCP Range of ISP (main) router
- Connect an ethernet cable from the LAN port of the ISP (main) router to your Windows Laptop/Desktop in order to get internet connectivity on your device.
-
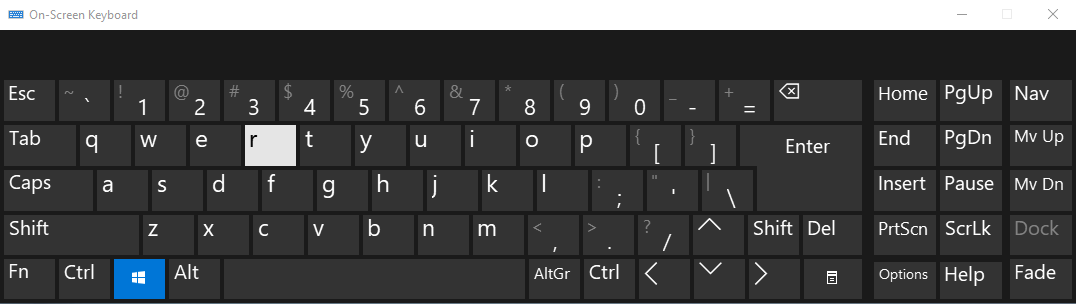
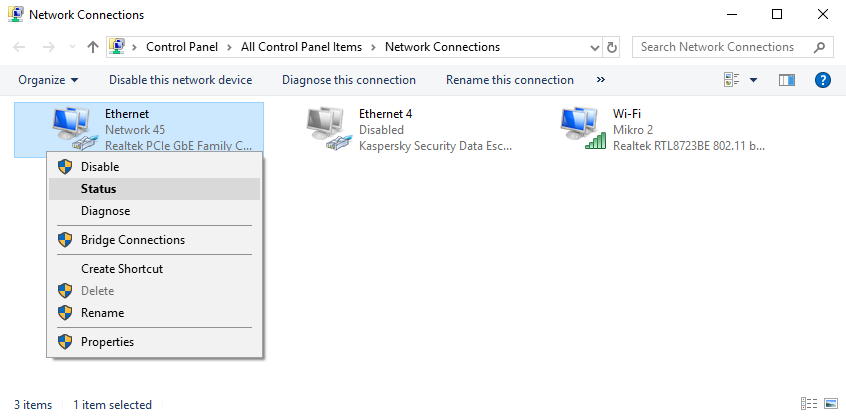
Click on Windows + R buttons on the keyboard simultaneously.
-
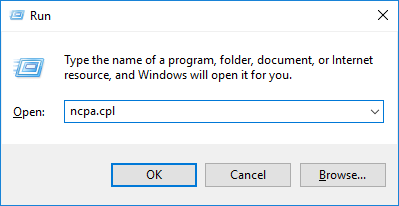
In the Run window that pops up, type ‘ncpa.cpl’ and hit Enter. The network connections window loads up.
-
Right-click on the Ethernet adapter and click on ‘Status’, then click on the ‘Details’ button.

-
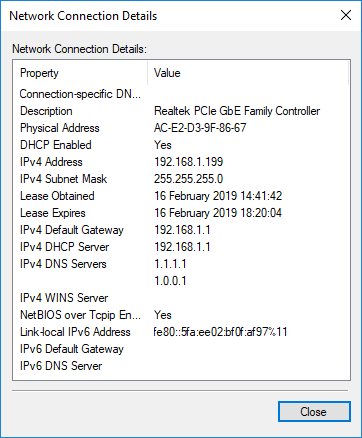
Note down the IPv4 Default Gateway (192.168.1.1) and IPv4 Subnet Mask (255.255.255.0) which has been set up on the ISP (main) router.
-
Step 2: Configure a Static IP to the routerboard for internet access
-
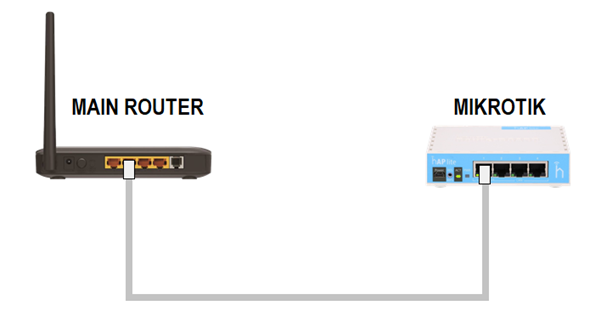
Now detach the ethernet cable from your Laptop/Desktop and attach it to the WAN (Ether1) port of the routerboard, as illustrated below. In this example, we will use the ether1 port as the default WAN port but you can use any port as WAN port but make sure the LAN port is also connected with that Ether port. Attach another cable from the LAN port of the MikroTik router to your laptop/desktop. (Note: Any port on the MikroTik router can be configured as an Internet/WAN port, in our case, we have selected the 1st port itself)
-
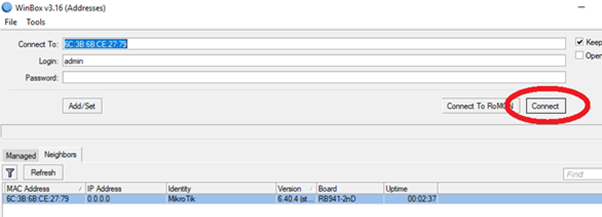
Now, double click on the Winbox setup which you must be having it on your desktop/laptop already.
Go to ‘Neighbors’ -> Click on detected router.
Default username: admin. Default password is left blank. If you had already assigned some username and password to the routerboard then use those credentials.
Click ‘Connect’ to log in to the MikroTik router.
-
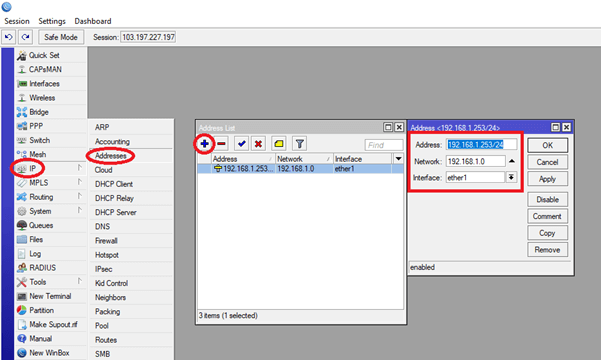
Go to IP -> Addresses. Click on ‘+’ to add a new address. Choose an IPv4 address to be assigned to the WAN interface that belongs to the same subnet that has been set up on the ISP (main) router. In this case, we will assign an IPv4 address 192.168.1.253 to WAN port with a CIDR notation of /24 to ether1. Click Apply then OK.
P.S.: /24 is equivalent of 255.255.255.0 - if the subnet mask was 255.255.0.0 then you must use notation of /16.
-
Step 3: Configure the Internet Gateway & DNS Settings
-
Go to IP -> Routes. Click on ‘+’ to add a new route. Enter the gateway ‘192.168.1.1’ as obtained from step 1.5. Click apply then OK.
You will notice that a new rule is added that states that the specified gateway is reachable through ether1.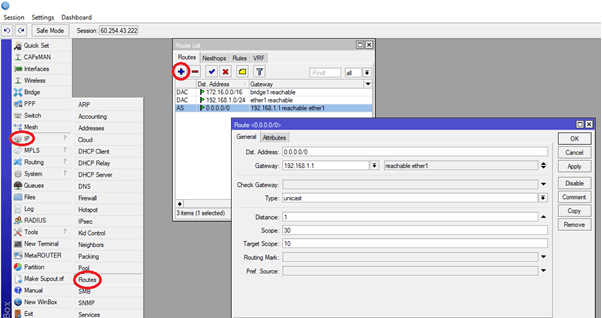
-
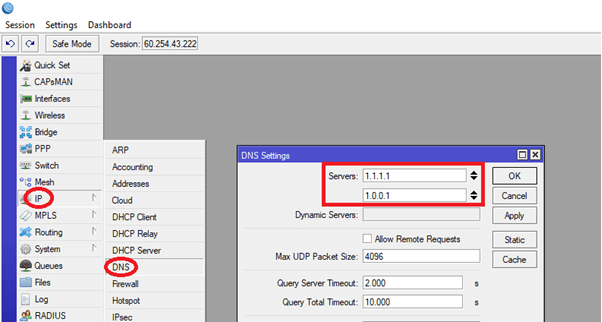
Go to IP -> DNS. Set up the Primary and Secondary DNS servers. You can choose to use global standard DNS servers which are available for FREE
Cloudflare: 1.1.1.1 or 1.0.0.1
Google: 8.8.8.8 or 8.8.4.4
Or you can use the same DNS server settings recommended by your local ISP.
DNS configuration is important as it helps in resolving domain names into IPs.
-
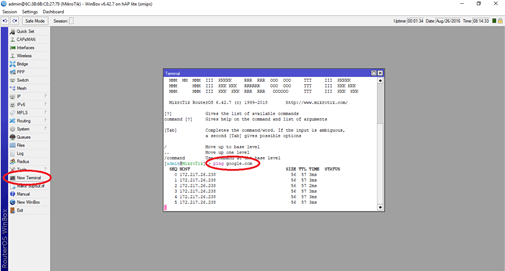
The internet connectivity has been set up on the routerboard with Static IP (192.168.1.253). Now, use ‘New Terminal’ to check connectivity with the ‘ping’ command.
ping google.com
Now we have the following details available from the ISP (main) router - IPV4 Default Gateway: 192.168.1.1 IPv4 DHCP Server: 192.168.1.1 IPv4 Subnet Mask: 255.255.255.0 With subnet mask details, we can figure out the IP range available in the DHCP Pool (192.168.1.1 to 192.168.1.254)
Dynamic IP Setup:
The second method is to configure the WAN port on MikroTik Routerboard as a DHCP Client, so that the WAN port is dynamically assigned and IP address belonging to the DHCP pool on the main router when an ethernet cable is connected from the LAN port of the main router to the WAN port.
Follow these steps to set up WAN port as a DHCP client:
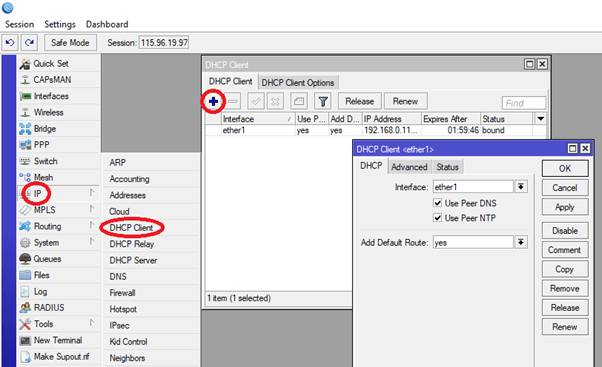
- Go to IP -> DHCP Client
- Click on ‘+’ to add a new entry.
- In ‘DHCP’ tab, select Interface as ‘ether1’
Leave ‘Add Peer DNS’ and ‘Add Peer NTP’ ticked as DNS servers and NTP servers set up on the main router will also be dynamically added to the MikroTik router. (You can still manually configure the DNS settings on the routerboard as described in step 3.2 (Go to IP/DNS)
Select ‘Add default route’ as ‘Yes’. This will add a dynamic route from MikroTik routerboard to the main router. Click ‘Apply’, then OK.
The router now has internet access. Now, use ‘New Terminal’ to check connectivity with the ‘ping’ command.
While you might feel the configuration of Mikrotik router is a bit different than normal home-based routers (TP-Link or D-Link) but it offers multiple options to configure your network as per your desired network architecture.
If you are still struggling to configure the setup, feel free to comment here, we shall try to answer your queries as soon as possible.